
WP Rocket
WP Rocket simplifies and accelerates your WordPress website’s performance primarily through its basic page caching feature. This single feature can make a significant difference in your site’s loading speed.
Enabling WP Rocket
It’s important to note that WP Rocket must be individually activated on each site within our WordPress multisite environment. While it should be automatically activated on your site, if you encounter any issues or find that it’s not active, please don’t hesitate to contact us for assistance. We’re here to ensure that your website runs smoothly, and activating WP Rocket correctly is a crucial step in optimizing your site’s performance. To request assistance, please use our web request form, and our support team will promptly address any concerns and help you get WP Rocket up and running on your site.
How Page Caching Works
WP Rocket’s page caching stores a copy of your website’s pages as static HTML files on your visitors’ computers. When that visitor revisits an unchanged page on your site, instead of generating the page content from scratch, WP Rocket serves that stored HTML file. This process dramatically reduces the time it takes for the page to load, providing a faster and smoother browsing experience for your visitors.
Regular Cache Updates
WP Rocket automatically updates cached pages whenever you make changes to your website, such as publishing new content or updating existing pages. This ensures that your visitors always see the latest version of your site.
Clearing the Cache
WP Rocket makes it easy to clear your website’s cache directly from the WordPress admin bar. This can be particularly useful when you’ve made changes to your site and want to ensure that visitors see the latest content without any cached data. Here’s how to clear the cache using the WP Rocket dropdown menu:
- Log In: Begin by logging in to your WordPress Dashboard as an administrator.
- Admin Bar: Once logged in, you’ll see the WordPress admin bar at the top of your screen when viewing your website. Look for the WP Rocket menu. It’s usually located on the right side of the admin bar.
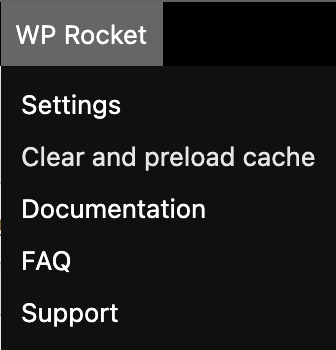
- Hover Over WP Rocket: Hover your mouse pointer over the WP Rocket menu in the admin bar. This action will reveal a dropdown menu with various cache-related options.
- Clear Cache: In the dropdown menu, locate the option that says “Clear and preload cache” or something similar. This is the command you’ll use to remove all cached content.
- Click “Clear and preload cache”: Click on the “Clear and preload cache” option in the WP Rocket dropdown menu. WP Rocket will initiate the cache clearing process.
- Confirmation: Depending on the size of your website and the cache, this process may take a few seconds to complete. Once finished, you should see a confirmation message indicating that the cache has been cleared successfully.
- Refresh Your Website: To verify that the cache has been cleared, simply refresh your website in your browser. You should now see the most up-to-date content without any cached data.
Clearing the cache via the WP Rocket dropdown menu is a quick and convenient way to ensure that your visitors always have access to the latest content on your website. It’s a valuable tool when making changes or updates to your site’s design or content.