
Cover
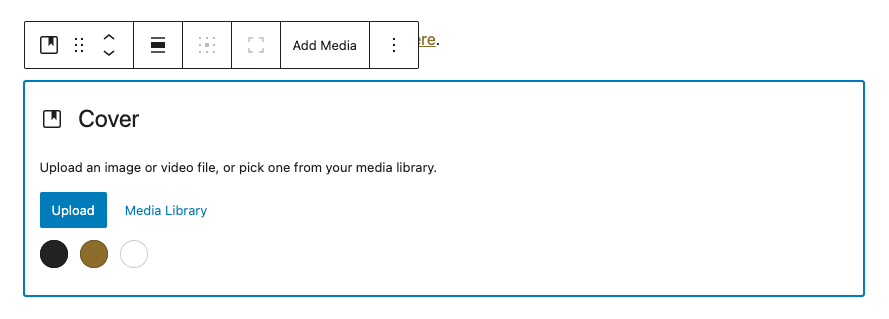
To give your post or page a sleek, professional look, you can add a Cover Block. Get started by clicking the inserter icon.
Welcome to The Forest
Detailed instructions on adding blocks can be found on Building a Page.
Once you add the Cover Block, you can upload a new image/video from your device or select an image/video you’ve already uploaded to your site’s media library.
If you don’t want to use image/video, you can also pick a solid color as your cover.
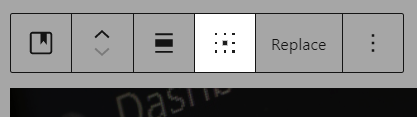
Block Toolbar
Every block comes with unique toolbar icons and block specific user controls that allow you to manipulate the block right in the editor.
The Cover Block shows standard seven buttons:
- Transform to
- Moving handles
- Change alignment
- Change content position
- Toggle full height
- Replace
- More options
Change content position
Change content position option allows you to change the position of content within your cover.
Toggle full height
Replace
This is another option in the Cover Block’s toolbar. Choosing this will allow you to select a new image file for your block. Use this if you need to replace the image file in your Cover Block.
Block Settings
Every block has specific options in the editor sidebar in addition to the options found in the block toolbar. If you do not see the sidebar, simply click the ‘cog’ icon next to the Publish button.
Media settings
Fixed & Repeated Background
You can use the Repeated background toggle in combination with Fixed background, but Fixed background does not necessarily have to be turned on. Feel free to play around with these options to find what suits your needs.
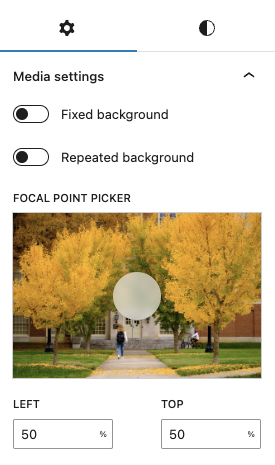
Focal Point Picker
If the fixed background option is turned off, you will see the focal point picker. This tool lets you identify the main point of interest in the photo and highlight. Click on the picker to drag it to the spot you want, or use the horizontal and vertical position percentages below to set it manually.
Dimensions
Allows you to change the height of your cover according to your requirements.
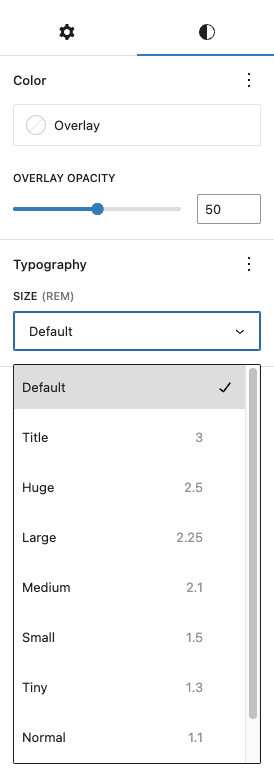
Overlay Color
Using the Overlay Color options, you can add a color overlay to the cover image. By default, this is a gray, transparent overlay, but with the overlay color options, you can switch that color to any other color of your choice.
Opacity
Using the Opacity slider, you can set the opacity of the cover image’s overlay. Moving the slider right toward 100 makes the overlay darker and more opaque, and moving it left toward 0 makes the overlay lighter and more transparent. At 100, the overlay is completely opaque and the cover image is no longer visible. At 0, the overlay disappears completely, leaving only your image.
NOTE: If you’re adding text over your cover image, you need to make sure the overlay is dark (or light) enough for text to be legible.
Font Size
The cover block automatically comes with a large, centered, serif font as its content, but under the styles you are able to change to other preset font sizes. This is helpful if you’d like to use the cover block as a decorative row background and you want to use regularly sized paragraph (normal) text in your nested text blocks.